Secure your Ghost blog
Use CloudFlare to secure your Ghost blog with SSL, as well as utilising security headers in NGINX, in this quick and easy to follow guide from Ghost Pi.

If you have been following my guide on how to install Ghost on Raspberry Pi, you should now have a fully working Ghost blog accessible to anybody who knows your domain name.
However, you may have realised that at the moment your Ghost blog is only accessible via http instead of the more secure, and SEO boosting https. Thankfully, adding SSL encryption to your Raspberry Pi hosted blog, is pretty straight forward. Please note, this guide assumes you have followed my guides and are using CloudFlare.
We'll also be adding a few security related headers to our NGINX configuration file to boost the security performance of our Raspberry Pi hosted Ghost blog too.
HTTP vs HTTPS
Before we dive into enabling SSL encryption, it is good to understand why you might want to do this. Simply put, Google favours sites that uses SSL because of the security benefits this brings. Sites that use SSL, encrypts data between the server and your browser so even if hackers intercept it, they will have a hard time decrypting it.
Therefore, sites that use SSL encryption will be easier to find on Google.
Enabling SSL
The first thing to do is to tweak a few settings in your CloudFlare account, specifically the Crypto tab. To enable SSL protection in CloudFlare, simply select Flexible from the drop-down menu.
This process can take up to 24 hours to complete fully, as CloudFlare needs create and sign an active certificate, so make sure you see the "Active Certificate" setting before proceeding to the next steps below.
There are other settings you can select - Full and Full (strict), but for the purpose of this guide Flexible will be perfectly fine. To take advantage of Full and Full (strict), you need to have a third-party SSL certificate installed on your server.
SSL in Ghost
Once SSL has been enabled within CloudFlare, you need to make a few changes to your Ghost setup to make sure that this works correctly. We need to update our config.js file:
boo@ghostpi ~ $ nano /var/www/ghost/config.js
Then simply change the following:
production: {
    url: 'http://my-ghost-blog.com',
To:
production: {
    url: 'https://my-ghost-blog.com',
Notice the https part!
Exit CTRL+X and save Y then to make the changes live, we need to restart Ghost:
boo@ghostpi ~ $ sudo supervisorctl restart ghost
Update your blog
The last part is to ensure you log in to your Ghost blog and then make sure you update the home link in the Navigation section, as this will still be the http version.
Security headers and NGINX
The last part to securing our Raspberry Pi hosted Ghost blog is to add a few security headers to our NGINX configuration file. The particular headers we'll add are:
You can read all about these headers by following the links above, but to enable them on your NGINX server, you need to edit your ghost.conf file that we created previously:
boo@ghostpi ~ $ sudo nano /etc/nginx/sites-available/ghost.conf
Then just add the following to the top:
add_header X-XSS-Protection "1; mode=block";
add_header X-Frame-Options "SAMEORIGIN";
add_header X-Content-Type-Options nosniff;
So your ghost.conf file should look like this, obviously with {DOMAIN} will be your custom domain name:
add_header X-XSS-Protection "1; mode=block";
add_header X-Frame-Options "SAMEORIGIN";
add_header X-Content-Type-Options nosniff;

server {

    listen 80;
    server_name {DOMAIN};

    location / {
        proxy_set_header   X-Real-IP $remote_addr;
        proxy_set_header   Host      $http_host;
        proxy_pass         http://127.0.0.1:2368;
    }

}
The last thing to do is to exit CTRL+X and save Y and then restart the NGINX server with:
boo@ghostpi ~ $ sudo service nginx restart
Test your security
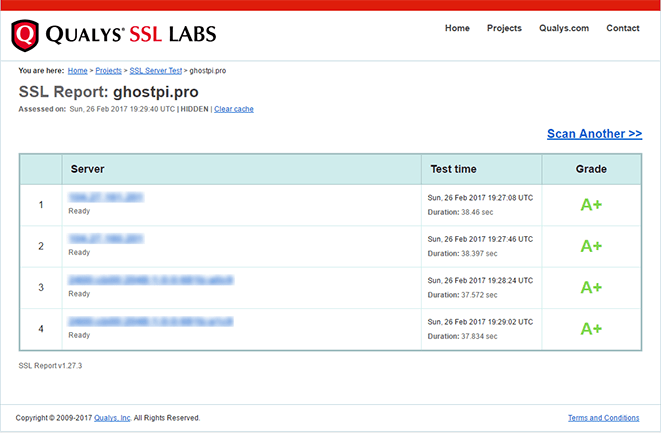
To test your site and the security you have just added, you can use a variety of different online tools. I found that the free SSL Server Test by Qualys SSL Labs does a great job, and will grade your site from A+ to F. It may be worth doing this before and after you have made the changes above to see how your compare.
Here are the results of my site just for proof (minus the IP addresses):
If you found this guide, as well as any other guides on Ghost Pi helpful, then if you wanted to buy Ghost Pi a coffee to show your support, then that would be greatly appreciated! As this site does not use any form of adverts, all the costs for running and maintaining the blog are done voluntarily so any extra would be fantastic!
