Install Ghost on ASUS Tinker Board with Armbian
The ASUS Tinker Board is a very capable, Raspberry Pi alternative. If you are anticipating a high-traffic blog, you may want to consider installing Ghost on Armbian on the Tinker Board to cope with the increased demands.

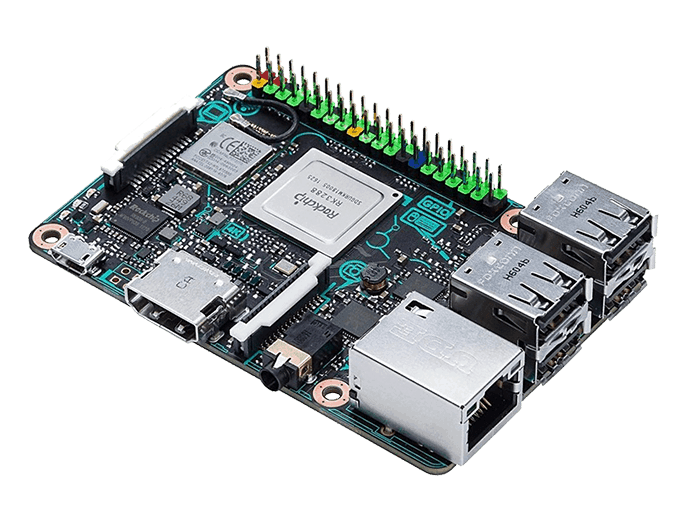
The ASUS Tinker Board was released, with little fanfare, back on 19 April 2017. To look at, the ASUS Tinker Board is almost identical to the Raspberry Pi as it shares the same form-factor which is great if you want to utilise any existing Raspberry Pi cases.
With superior specs in comparison to the Raspberry Pi 3, such as 2GB Dual Channel DDR3 memory, Gigabit Ethernet (on its own bus, unlike the Pi that shares this with USB), the Rockchip Quad-Core RK3288 processor and impressive 192kHz / 24-bit audio, I bought a Tinker Board shortly after launch in the UK for around £55.
I quickly realised that the downside to the Tinker Board was the supported software available at the time, which was very limited.
Fast forward to today and the support for the Tinker Board has grown somewhat, and there are now a range of OS's available to try, including some beta RetroPie and LAKKA images (which I'm quite excited about).
Armbian on Tinker Board
One OS that caught my eye was Armbian, a lightweight Debian Jessie or Ubuntu Xenial based Linux distribution that has dedicated Tinker Board image files ready to download and burn to the microSD card.
We used the Ubuntu desktop - mainline kernel version.
Raspberry Pi fans will be familiar with the setup process, which is a simple as download the OS and flashing it to your microSD card. Armbian does require a little extra setup, but nothing to strenuous:
- On the initial boot, you'll need to SSH into the Tinker Board as
rootand with the password1234 - Once logged in, you'll be forced to change the
rootpassword to your own. Do that and make it strong. - You'll then be asked to create a new non-root user - i.e.
booso follow the simple steps provided - Log out (
exitorlogoutin the terminal) and then log back in using your new user and password - i.e.ssh [email protected]
Optional - secure your Tinker Board with SSH keys
If, like me, you want to add some additional security you can configure SSH keys and prevent password authentication which is great if you don't want to provide your password everytime you SSH into your Tinker Board. To save making this any longer than necessary, take a look at this page from the Raspberry Pi website and then the following page on RasPi.TV on how to achieve this.
Disable the boot to desktop option
As the image we've downloaded is the Ubuntu desktop version, by default your ASUS Tinker Board will boot to a desktop environment. This is not needed if you're going to be using the Tinker Board to host your Ghost blog, so do the following:
- SSH into the Tinker Board and then run
sudo armbian-config- this is very similar to theraspi-configtool on Raspbian - Select the
Systemoption using your keyboard - In the new menu, select the
Desktopoption and then confirm that you want to disable the boot to desktop option
Install Ghost on Armbian
Ok, so now we should be ready to install Ghost on your ASUS Tinker Board running Armbian. These steps are pretty much identical to the steps on installing Ghost on Raspbian guide:
boo@ghost-tinker ~ $ sudo apt-get update && sudo apt-get dist-upgrade -y
Install the required packages
The new Ghost CLI tool requires a number of packages before it will work properly. We'll install these as follows:
boo@ghost-tinker ~ $ sudo apt-get install ufw nginx mariadb-server -y
This will install:
- UncomplicatedFirewall (ufw) - not essential, but highly recommended for securing your Ghost blog
- NGINX (nginx) - free, open-source, high-performance HTTP server and reverse proxy
- MariaDB (mariadb-server) - one of the most popular database servers in the world.
Configure UncomplicatedFirewall
To prevent any potential issues arising when installing Ghost on Armbian, you need to enable a few rules within UFW. This is dead simple:
boo@ghost-tinker ~ $ sudo ufw allow ssh && sudo ufw allow http && sudo ufw allow https && sudo ufw allow 'Nginx Full'
You can run all those commands individually if you want, but the above will do the same in a shorter space of time. In short, this is telling UncomplicatedFirewall to allow SSH access, HTTP and HTTPS traffic and the NGINX rules accordingly.
Finish off by enabling UncomplicatedFirewall with:
boo@ghost-tinker ~ $ sudo ufw enable
Configure MariaDB
As Ghost needs a database, we first need to carry out some initial configuration of the MariaDB server we just installed. Start the ball rolling by running:
boo@ghost-tinker ~ $ sudo mysql_secure_installation
You will then be asked a series of questions - they can look a little daunting, but this should hopefully help! Firstly, it will ask you for your root password (for your database). You probably don't have one, so just press Enter to get started.
It is now a good time to set a root password, so follow the prompts and do just that. The next few questions are summarised as follows, including the answers Ghost Pi used:
Remove anonymous users?- YESDisallow root login remotely?- NORemove test database and access to it?- YESReload privilege tables now?- YES
The wizard does provide additional information on the above steps, so we won't go into detail here. Once you have followed the above, you should be back at the command prompt. This is good!
Tweak the database
The Ghost CLI can create databases for you during the initial install, but there are a few tweaks needed before this can happen:
boo@ghost-tinker ~ $ sudo mysql -u root -p
You'll be asked for your root password - you know, the one you just created a few minutes ago - so enter that (it won't show as you type for security through obscurity reasons). Then you'll need to enter the following commands in MariaDB:
MariaDB [(none)]> USE mysql;
MariaDB [(mysql)]> UPDATE user SET plugin='mysql_native_password' WHERE User='root';
MariaDB [(mysql)]> FLUSH PRIVILEGES;
MariaDB [(mysql)]> exit;
Note, the commands are the USE mysql; parts and need to be capitalised as shown, and need to include the semi-colons (;) to denote the end of the line too.
Tweak NGINX
Some people have reported issues with NGINX, relating to the hash_bucket_memory_size but again, this is easily fixed:
boo@ghost-tinker ~ $ sudo nano /etc/nginx/nginx.conf
Find the line that has the hash_bucket_memory_size option (TIP: press CTRL+W then type hash_bucket_memory_size and finally ENTER to search for the line instead of trying to find it manually) then uncomment by removing the hash (#). The default setting of 64 can be left as is.
You can then test and reload your NGINX service as follows:
boo@ghost-tinker ~ $ sudo nginx -t
boo@ghost-tinker ~ $ sudo systemctl restart nginx
If you have any issues after running sudo nginx -t then the readout in the terminal should help identify them, usually a typo! Edit your config file again and retest.
Install Node.js on Armbian
Thankfully, installing Node.js on Armbian is really simple! The following commands will install the latest supported version (Ghost only supports certain version of Node.js):
boo@ghost-tinker ~ $ curl -sL https://deb.nodesource.com/setup_6.x | sudo -E bash
boo@ghost-tinker ~ $ sudo apt-get install -y nodejs
Once this has been completed, you can now move onto installing the Ghost CLI tool!
Install Ghost CLI on Armbian
Once Node.js has been successfully installed, you can now install the Ghost CLI tool:
boo@ghost-tinker ~ $ sudo npm i -g ghost-cli@latest
On my ASUS Tinker Board, this was pretty quick thanks to the extra processing power the board offers in comparison to the Raspberry Pi. You'll also notice that you won't be warned by the CLI tool that you are installing Ghost on a non-supported OS as Armbian is based on Ubuntu - bonus!
Create your Ghost blog folder
You will need to create the Ghost install folder and you will need to do this first:
boo@ghost-tinker ~ $ sudo mkdir -p /var/www/ghost
boo@ghost-tinker ~ $ sudo chown [user]:[user] /var/www/ghost
boo@ghost-tinker ~ $ cd /var/www/ghost
Obviously you will need to replace the [user]:[user] part with your username (which is whatever you chose as your new non-root user on a vanilla Armbian image and made no other changes yourself).
Now that we're in the Ghost install directory (i.e. where your Ghost blog will be installed on Armbian), we can begin the install.
Install Ghost 1.x on Armbian
Now we get to the good stuff, actually installing Ghost on your ASUS Tinker Board running Armbian! Firstly, let's just double check we're in the correct directory:
boo@ghost-tinker ~ $ pwd
You should see /var/www/ghost if you have just followed the steps above.
Now you can start the install with:
boo@ghost-tinker ~ $ ghost install
During the install, you'll be asked a few questions that need your response. They should be straight forward, and should obviously correspond to your own blog details, but this is how Ghost Pi answered:
Continue anyway?- YESEnter your blog URL:/Enter your MySQL hostname:localhost (or simply pressENTER)Enter your MySQL username:root (or simply pressENTER)Enter your MySQL password:********************** (enter your password here)Enter your Ghost database name:ghostpi_prod (or whatever you want)Do you wish to set up Nginx?- YESDo you wish to set up SSL?- NO (I use CloudFlare for this)Do you wish to set up "ghost" mysql user?- YESDo you wish to set up Systemd?- YESDo you want to start Ghost?- YES
All being well, your Ghost blog should now be installed on Armbian! You'll need to make sure you configure your Tinker Board to allow external access, and access from a custom domain name (which is covered on this guide from Ghost Pi) and you should now have Ghost 1.x up and running on Armbian on your ASUS Tinker Board!
If you found this guide, as well as any other guides on Ghost Pi helpful, then if you wanted to buy Ghost Pi a coffee to show your support, then that would be greatly appreciated! As this site does not use any form of adverts, all the costs for running and maintaining the blog are done voluntarily so any extra would be fantastic!
